
Method 1 is the more comprehensive treatment compared to Method 2, but requires a bit more elbow grease. It mimics procedures used at commercial head lice removal clinics and is proven to work.
If you haven’t already, please read the article ‘Head lice treatment‘ to see if this method is the one for you.
Assuming you have the items from the ‘things to buy‘ page on hand, you may finally begin the procedure!
METHOD 1 item list:
- Stainless steel nit comb
- Hair dryer (any that outputs ~130 °F will do)
- 100% Dimethicone oil
- Shower Cap
- Dressing Comb
- Baking Soda (optional)
- Lice and nit killing hair dryer diffuser (optional)
Step 1: Nuke Lice and Nits with hot air
Step 1 aims to kill nits and lice in the critical area within 1/4″ from the scalp
You’ll want to set up a work-space in a garage or another area where you don’t mind lice dropping to the floor.
Use a hair cutting cape (or a white trash bag with hole cut into it for the persons head – I like white because it allows me to see lice that fall out) and drape it over the person like a poncho to keep lice that fall out of the hair from getting onto clothing.
If you are a person with long hair performing this treatment on someone else, it may be a good idea to put your hair in a ponytail or tie your hair up and wear a shower cap to minimize contracting lice yourself.
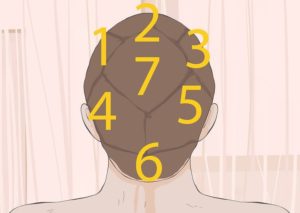
Section the hair of the person receiving lice treatment as shown below using clips or hair ties:
Use a hair dryer and set it to the maximum heat setting. Test the hot air output temperature is 130 °F using a kitchen thermometer (if you have a heat adjustable hair dryer, set to 130 °F). If the temperature is lower than this, you will need to lengthen the time spent on each section of hair accordingly.
Take one section of hair and position the clip or band near the ends/tip of the hair section. Hold the hair section loosely (to allow the hair strands to move freely and independently and allow for gaps between hair strands so hot air can permeate through the section).
Aim the blow dryer hot air output toward the roots of the hair section (viable nits are within the area 1/4″ away from the scalp). It works best by directing the air from the side so the heat is not aimed fully at the scalp, but parallel to the head instead, while blowing directly through the selected section of hair. This will allow nits to be exposed to heat for prolonged periods of time while reducing scalp discomfort for the person being treated. Heat the hair section for 2-5 minutes** while alternating the direction of hot air to all sides of the section (hold a position for at least 30 seconds each side).
You may begin to see lice dropping out of the hair and onto the trash bag poncho at this time. The hot air treatment is working and the prolonged contact with heat is drying out the nits and smaller lice (lice may still be moving after dropping out of the hair).
Repeat this procedure with each section of hair. This part of the process should take about 30 minutes and is directed mostly to desiccating and killing the eggs of the head louse (nits). You’ll probably still see larger lice milling about in the portions of hair that were not treated with hot air. Don’t worry, we’re going to target them next.
**using a temperature of 122 °F would take 5 minutes, whereas a temperature of 130 °F would take about 1-2 minutes.
Step 2: physically remove as many lice and nits from the hair by using the nit comb
Step 2 aims to physically remove lice and nits.
**Optional but recommended: To keep things slick and help de-tangle, mix a little spray bottle containing a small amount of baking soda and water to spritz some onto the hair during this step.
After the hot air treatment, its time for the most time consuming portion of this method, nit combing.
You may feel that sectioning hair in the beginning of the de-lousing treatment is a waste of time. However by doing so, it greatly increases thoroughness and allows for a better nit combing technique over the course of the treatment.
Mama said to do it, you wont regret it.
- Rinse the hair of the person who is being treated for lice. Do a quick towel dry. The hair should should be damp (try adding some baking soda to the rinse to help with de-tangling the hair).
- Section off the hair once again.
- Comb out each hair section before using the nit comb to remove any knots or tangles which may cause the nit comb to catch.
- Wet the nit comb, dip the tips in the baking soda, and begin to comb out each section by running the nit comb through a .5 to 1 inch diameter portion of hair. You will want to start as close to the scalp as possible while running the comb all the way out and past the tips of the hair (remember viable nits are within 1/4″ from the scalp!). If the hair is too difficult to run through, spray some of the baking soda and water mix, or a tiny bit of Dimethicone oil. Periodically clean the nit comb by wiping it on a paper towel.
- I found that it was helpful to vary the sides from which I inserted the comb to remove nits. By varying the approach, the nit is more likely to hit the sides of the nit comb pins and be removed during the process.
- Repeat for each section of hair.
Step 3: Saturate the hair with Dimethicone and soak for 1 hour
Step 3 aims to kill nits and render them non-viable, will also kill any remaining lice.
Take a quick break. Really. By now you’re probably 1.5 hours into the delousing treatment, and pretty tired and frustrated (if you’re removing lice from a child, you’ll have probably heard “OW!” maybe 100x by now). Take a quick 5 minute break and come back to finish this portion.

- Rinse the hair of the person who’s head is being treated to remove anything that was not combed out and to remove any residual baking soda etc.
- Towel dry the hair (it doesn’t need to be completely dry).
- Drape a towel over their back and over and across the shoulders to protect the body from oil splatter. It helps to put a towel over the persons lap to protect pants from getting oil on it as well.
- Starting with the center of the head, apply a line of Dimethicone oil** from middle of the forehead hairline to top middle of the head. Next, comb over that line of oil with untreated hair, laying the untreated hair over the oil and towards the opposite side you are working towards. For example, if you are standing behind the individual you would make a line of oil from the middle the forehead hairline to the top-middle of their head. You would then take a combs-length amount of hair immediately adjacent to that line of oil (on the left) and overlap the oil line with untreated hair extending it over to the right side. This creates another hairline to the left which you can then continue applying a line of oil and combing over each oil line with untreated hair.
- Once the left or right side is saturated, repeat for the opposite side.
- Once the left and right side of the head is completed, have the person look down towards the ground so the back of their head is exposed. Flip the hair from the back over to the front towards their face and begin to saturate and comb the hair starting from the back of the neck hairline towards the top middle of their head. Keep combing and adding oil till the hair is evenly saturated.
- After the back of the head is saturated, have the person look level and forward, and begin combing the entire length of their hair from the scalp to the tips, and add oil to dry spots if necessary.
- When done, the hair should be fully and completely saturated. It should be slick and weighty, but not overly dripping with oil.
- If long, place hair into a high bun using a hair tie/band.
- Cover exposed hair with a shower cap
- Let covered hair soak in Dimethicone for 1 hour.
**By applying lines of oil in an orderly fashion you keep things clean and waste as little oil as possible.
Step 4: Shampoo Hair and move on with life.
Step 4 aims to clean oil and any other stuff left behind in the hair.
After the hour-long Dimethicone soak, remove shower cap and shampoo hair.
You or the person is now able to live life as normal while adhering to the rules outlined in the ‘learn about lice’ section for the next few days or until all members of the household are treated and in the clear from head lice infestation.
Professional lice removal clinics recommend using a nit comb every day over the next 10 days to remove any dead nits and lice that may not have been removed during the initial combing procedure.
Keep any eye out: Re-apply Dimethicone 9 days after initial treatment (for 1 hour)
This step is optional but good for peace of mind.
Professional lice removal clinics are confident that this procedure does not need to be followed up with another treatment of any sort.
However, if you were not confident in the thoroughness of the treatment provided, its always advisable to do another 1 hour-long Dimethicone hair soak 9 days after the initial treatment.
This will destroy any remaining lice and ensure you are completely de-loused.